So yesterday we at the first turkey. It was the large Royal Palm tom that was fighting last week. We chose him because he was the biggest.
Here's two videos showing what we did. The first one is everything pre-cooking and shows a dead turkey but no killing. The second video shows how we cooked it.
The turkey tasted good and fed 15 of us. The differences between it and a commercial turkey were that the breast was much smaller and the dark meat was much darker. I'm not sure if I would raise turkeys again to eat but it's been an interesting process.

Showing posts with label Turkeys. Show all posts
Showing posts with label Turkeys. Show all posts
Sunday, November 27, 2011

Turkey Fight
Alex and I were cleaning out the chicken coop to make it ready to move the 3 pullets up from the chicken tractor. We were digging out 3 years worth of litter from the inside when we heard a commotion from the turkey coop.
The toms were fighting.
I had never seen them fight before and was a little taken aback at their hostility towards each other. It was like a switch had been flipped and they were no longer friends. I figure that the hens are finally old enough to be worth fighting for.
Although the blue slate tom has been the most assertive, the royal palm tom has at least 5 pounds on him and was easily able to overpower the blue slate.
They didn't show any sign of stopping so we finally moved the royal palm in the the newly finished chicken run just to get them away from each other.
The toms were fighting.
I had never seen them fight before and was a little taken aback at their hostility towards each other. It was like a switch had been flipped and they were no longer friends. I figure that the hens are finally old enough to be worth fighting for.
Although the blue slate tom has been the most assertive, the royal palm tom has at least 5 pounds on him and was easily able to overpower the blue slate.
They didn't show any sign of stopping so we finally moved the royal palm in the the newly finished chicken run just to get them away from each other.
Wednesday, October 12, 2011
Turkey Dance
I spent some time with the turkeys last weekend as I worked on the roof of the turkey coop and the run of the chicken coop. I normally only see them for a few minutes in the morning, so it was fun to watch their antics. The Turkeys will be 6 months old on October 24th and the toms have been putting on a show. The Blue Slate tom has recently decided that he's the boss and has been trying to dominate the Royal Palm tom, who is much bigger.
It's all rather dignified compared to chicken fights which are usually accompanied by squawking, flapping and dust storms.
There was one mild kurfuffle in the last video, but even that seemed more like the Royal Palm just tripped on his big feet.
For months I thought that I had 3 toms and 1 hen, but I have since revised that to 2 toms and 2 hens. The Blue Slate hen fooled me for awhile because her snood and dewlap where more developed than the other female.
I'm throwing around some new vocabulary words I learn at Texas Parks and Wildlife Magazine. I finally know what a snood is. Its that thing I've been calling a bealy bobber. The Blue Slate tom's snood is engorged with blood in these videos and hangs down over his beak.
This is from a Texas P&W article titled "Know Your Turkey Parts"
I have been remiss until now.
It's all rather dignified compared to chicken fights which are usually accompanied by squawking, flapping and dust storms.
There was one mild kurfuffle in the last video, but even that seemed more like the Royal Palm just tripped on his big feet.
For months I thought that I had 3 toms and 1 hen, but I have since revised that to 2 toms and 2 hens. The Blue Slate hen fooled me for awhile because her snood and dewlap where more developed than the other female.
I'm throwing around some new vocabulary words I learn at Texas Parks and Wildlife Magazine. I finally know what a snood is. Its that thing I've been calling a bealy bobber. The Blue Slate tom's snood is engorged with blood in these videos and hangs down over his beak.
This is from a Texas P&W article titled "Know Your Turkey Parts"
I have been remiss until now.
Spurs
Both sexes have spurs, although on females, the keratinized appendages are no more than small buttons protruding from the back of the leg a few inches above the foot. On males, spurs serve as a way to fend off other males when they spar for dominance when gathering a harem of hens. Spurs grow at the rate of about 1/4 to 1/2 inch a year and usually top off at about an inch and a half at 4 years of age.
Fan
A turkey’s fan is a prominent feature you’ll see when a tom struts. Made up of 18 tail feathers 12 to 15 inches long, toms display the fans to attract females during the breeding season. In juvenile males (also known as jakes), the middle tail feathers are longer than the rest of the tail feathers, but adult males have tail feathers uniform in length.
The tail feathers that make up the fan also aid in identifying the subspecies of turkey. On eastern wild turkeys, brown tips the tail feathers while the tips of Rio Grande turkeys’ tails are buff-colored.
Beard
Hanging down anywhere from an inch to more than 10 inches from a tom’s chest, the beard is actually a modified feather, even though it appears to be part of the turkey’s skin. The beard is coarse like a horse tail and grows three to five inches a year. A three-year-old bird would possibly have a nine-inch beard, and beards over 11 inches are rare.
Snood
The snood is a fleshy appendage that attaches just above the beak. When the tom relaxes, the snood is short — maybe half an inch long. When the tom struts, the snood engorges with blood and extends to hang down over the beak. According to the National Wild Turkey Federation, the snood has no known function.
Caruncles
On both the sexes, the caruncles are fleshy, bulbous bumps that grow over the head and neck. Even though they are less pronounced on females, the caruncles on a male turkey grow large and are especially pronounced on the lower portion of the neck. Usually pale in color, the caruncles engorge with blood and turn to bright red when the turkey struts or becomes aggressive.
Dewlap
Connecting the neck to the head just under the beak, the dewlap is present on both males and females but is more prominent on males. Like the caruncles and snood, the dewlap turns bright red when the tom gets excited.
Saturday, September 24, 2011
Turkey Coop 9
I spent some time extending the roost for the turkeys today. I went up one evening to check on them and the hen was sleeping on the ground. There just wasn't enough room for all four up there. I framed out what will be the front of the coop and added a 6' long roost. I'm hoping that will be enough.

This is what it should look like eventually. There will be a 2'x4' section on the left for storage and possibly nest boxes and the rest of the space will be for roosting.

I was planning on adding a door to close it all in with an opening for them to get out but I don't know if they care. Maybe it would just make me feel more at ease if they had an enclosed place to sleep.

Once I saw them moving around under it I started to wonder if they would have enough room to jump/fly up to the roost if I closed it all in. They have sort of a giant wing span at this point. I would also like to have the roost up as high as possible to keep them out of reach of critters that might get in. Maybe I should leave it all open so they can fly up. Ugh, decisions.

They do seem to like it though and would probably like it more if it was higher. I've heard of free-range turkeys sleeping high in trees or on top of houses. If I left it open I could provide them with some stair stepped roosts to make it easier to get up.

The two biggest toms were showing off for my friend Drew yesterday. I guess they never do this for me because they are used to me. It was kind of cute the way the puffed up. Their heads and necks changed color too and got more red and blue.


This is what it should look like eventually. There will be a 2'x4' section on the left for storage and possibly nest boxes and the rest of the space will be for roosting.

I was planning on adding a door to close it all in with an opening for them to get out but I don't know if they care. Maybe it would just make me feel more at ease if they had an enclosed place to sleep.

Once I saw them moving around under it I started to wonder if they would have enough room to jump/fly up to the roost if I closed it all in. They have sort of a giant wing span at this point. I would also like to have the roost up as high as possible to keep them out of reach of critters that might get in. Maybe I should leave it all open so they can fly up. Ugh, decisions.

They do seem to like it though and would probably like it more if it was higher. I've heard of free-range turkeys sleeping high in trees or on top of houses. If I left it open I could provide them with some stair stepped roosts to make it easier to get up.

The two biggest toms were showing off for my friend Drew yesterday. I guess they never do this for me because they are used to me. It was kind of cute the way the puffed up. Their heads and necks changed color too and got more red and blue.

Sunday, September 18, 2011
Turkey Update
Luckily the turkeys were unscathed in the dog attack. They must have been pretty freaked out when it was happening but they seemed fine by the time I got up there. I think I even saw one drink out of the new waterer, but maybe she was just pecking at it.

There are few things I still need to finish on the coop. One is enclosing the coop so it has four walls and a longer roost. The turkeys are so big now that the existing roost looks a little small for them.

I'm not sure if they even sleep up there or just use it as a jungle gym.

The Animal Control Officer that came to take the dog identified the turkey breeds immediately. It turns out that he lives in Antelope Valley where I got the turkeys and raises a bunch of animals himself. He also mentioned that it's nice that I've adhered to the set back requirements and have the coops far enough away from the neighbors' houses. I wonder what he would have done if the the coops were too close.

There are few things I still need to finish on the coop. One is enclosing the coop so it has four walls and a longer roost. The turkeys are so big now that the existing roost looks a little small for them.

I'm not sure if they even sleep up there or just use it as a jungle gym.

The Animal Control Officer that came to take the dog identified the turkey breeds immediately. It turns out that he lives in Antelope Valley where I got the turkeys and raises a bunch of animals himself. He also mentioned that it's nice that I've adhered to the set back requirements and have the coops far enough away from the neighbors' houses. I wonder what he would have done if the the coops were too close.
Friday, September 9, 2011
Automatic Bucket Waterer
I've had an automatic waterer in the chickens' coop for a few years but haven't been thrilled with it. It's nice that the chickens always have access to water but it is an open bowl that gets pretty dirty with all the scratching that the chickens do. The little roof that I built to keep the chicken droppings out does nothing to keep the dust out.

I thought I would try to build my own waterer that would keep the water clean. I started with a 5 gallon bucket I got from the doughnut shop. It used to hold hot cocoa mix and smelled great.

I ordered some "360 Super Flow Nipples" from Farmtek. These are more commonly used in big chicken operations but they should work for my little bucket waterer too. The chickens push on the little nipple and that allows water to flow out.

I needed some sort of float valve to stop the water once the bucket was filled up. Most of the valves I found online were more expensive than I wanted to pay so I opted for a vertical toilet float valve. It was only $6 and would fit in the bucket.

I cut the holes for the valve and the nipples in the bottom of the bucket.


The nipples have threads that screw into the hole and seal the opening.


An adapter and toilet connector allowed me to attach the valve to a garden hose.


Here's a video of me trying it out for the first time.
Who knew that water shoots out so hard inside a toilet? Not me. I got a little wet on that one, but the valve worked great and shut off just as expected. I added the blue hose to the outlet which should direct the water down rather than straight at the bucket wall. I guess it won't matter once the lid is on.
And a video of the nipples in action. I guess the chickens are going to have work a little to get enough water.
The chickens will have to learn how to use these before I can take the other waterer out but once one learns the others should pick it up pretty quickly. I'm not quite sure how to teach them how to use it though. Hmm
Update 9/10/11:
I decided to put it in the turkey coop since the chickens already have the automatic dog bowl. I have all the pieces for 3 waterers but I need two more buckets.
I just bought one hose and cut it into peices.

I added new ends and then connected them to a new four spout manifold. I would like to have one water in the chicken coop, one in the run, and one in the turkey coop, so that will leave one spout for another hose.

I hung it up next to the existing waterer hoping that they will be curious about it and peck at the nipples.

It looks high but the turkeys are so tall now they won't even have to stretch to reach the bottom of the bucket.


I thought I would try to build my own waterer that would keep the water clean. I started with a 5 gallon bucket I got from the doughnut shop. It used to hold hot cocoa mix and smelled great.

I ordered some "360 Super Flow Nipples" from Farmtek. These are more commonly used in big chicken operations but they should work for my little bucket waterer too. The chickens push on the little nipple and that allows water to flow out.

I needed some sort of float valve to stop the water once the bucket was filled up. Most of the valves I found online were more expensive than I wanted to pay so I opted for a vertical toilet float valve. It was only $6 and would fit in the bucket.

I cut the holes for the valve and the nipples in the bottom of the bucket.


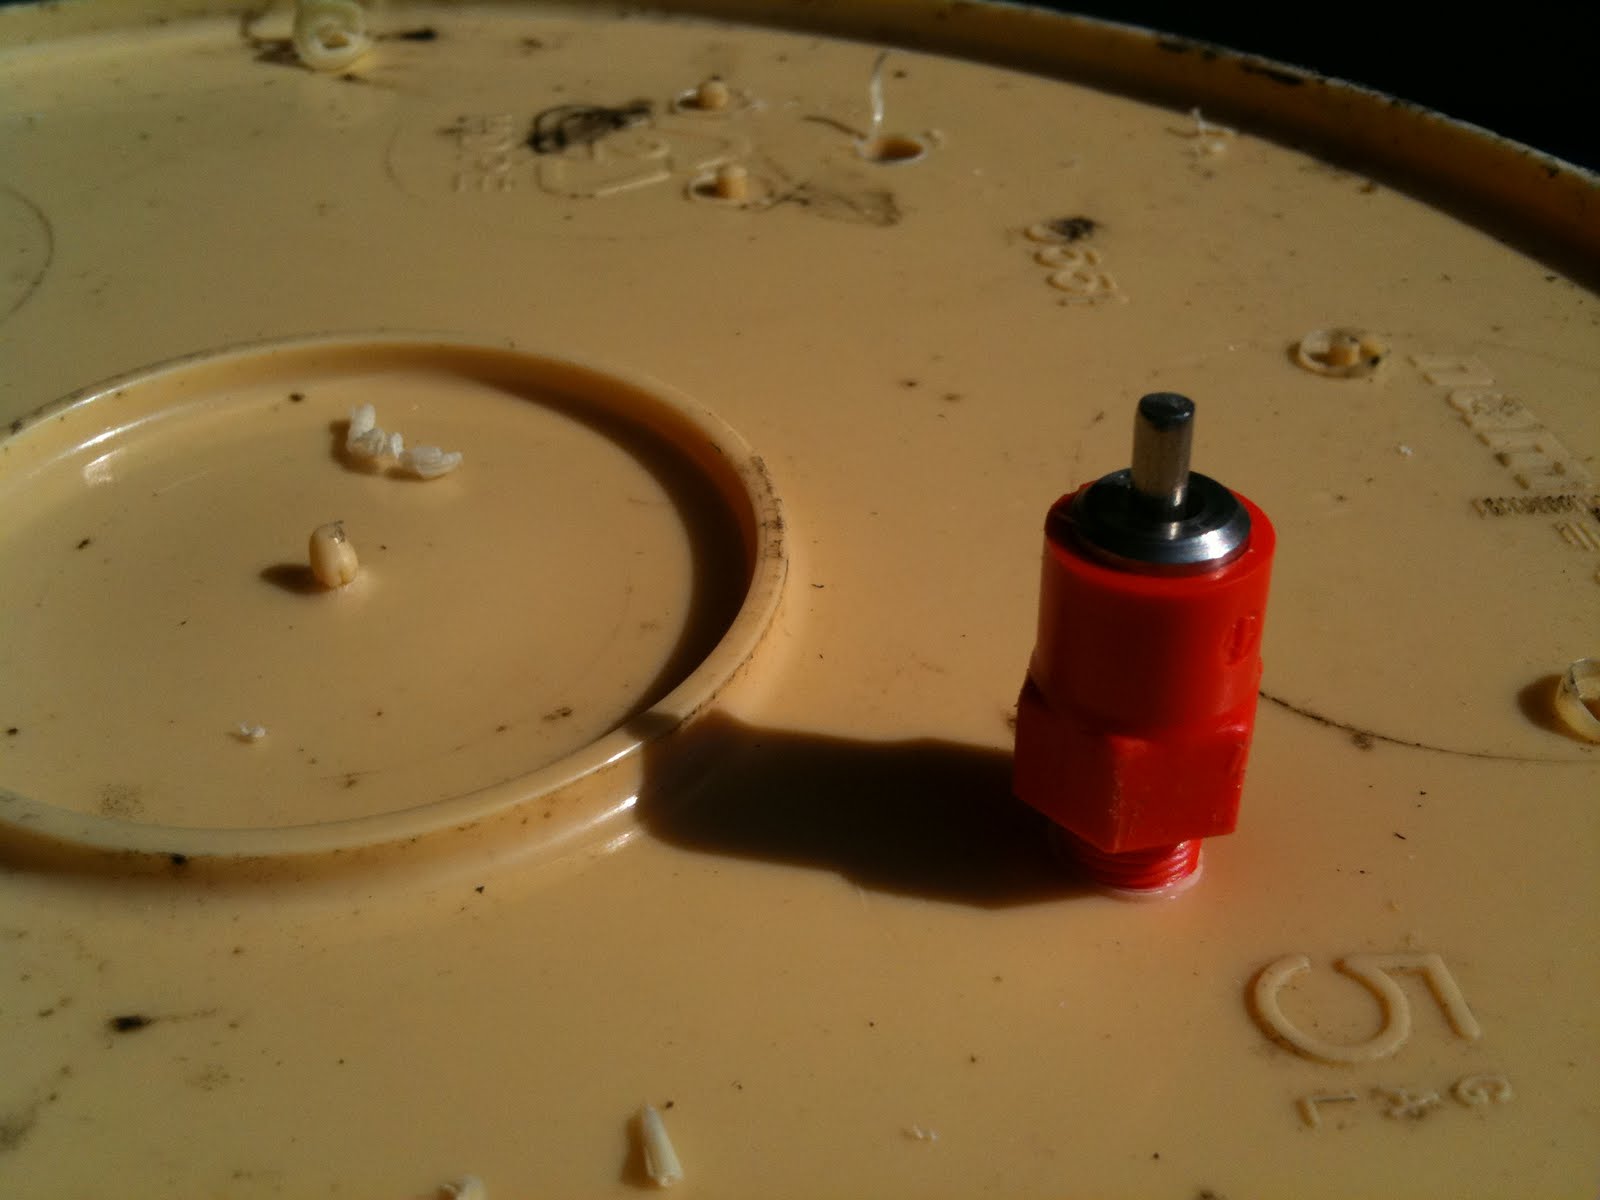
The nipples have threads that screw into the hole and seal the opening.


An adapter and toilet connector allowed me to attach the valve to a garden hose.


Here's a video of me trying it out for the first time.
Who knew that water shoots out so hard inside a toilet? Not me. I got a little wet on that one, but the valve worked great and shut off just as expected. I added the blue hose to the outlet which should direct the water down rather than straight at the bucket wall. I guess it won't matter once the lid is on.
And a video of the nipples in action. I guess the chickens are going to have work a little to get enough water.
The chickens will have to learn how to use these before I can take the other waterer out but once one learns the others should pick it up pretty quickly. I'm not quite sure how to teach them how to use it though. Hmm
Update 9/10/11:
I decided to put it in the turkey coop since the chickens already have the automatic dog bowl. I have all the pieces for 3 waterers but I need two more buckets.
I just bought one hose and cut it into peices.

I added new ends and then connected them to a new four spout manifold. I would like to have one water in the chicken coop, one in the run, and one in the turkey coop, so that will leave one spout for another hose.

I hung it up next to the existing waterer hoping that they will be curious about it and peck at the nipples.

It looks high but the turkeys are so tall now they won't even have to stretch to reach the bottom of the bucket.

Thursday, July 28, 2011
Turkey Coop, 8
Making a door was one of the last things I had to do for the turkey coop. It just so happens that the chicken coop has two doors. I borrowed one, temporarily, for the turkey coop.

I had a piece of sheet metal that was the original door that came with the shed kit. I screwed that over the opening. It's ugly but will keep predators out until I can replace the door.

The chicken door looks a little twee in the context of the turkey coop.

I also hit my head on the top a couple times. It will be nice to get a taller door in here at some point.

The other things I need to finish before moving the turkeys up was to fill in all the openings that a critter could get through. There were gaps between the rafters above the top plate that I filled with 2x4s

I added hardware cloth at the base to inhibit digging.

And I filled in the gaps between the back wall and the hill.

The mesh was just held on with staples so I covered the ends with particle board to hold it down. I'll replace it later with something more durable and better looking.

My goal was to make the coop safe enough to move the turkeys up. I can paint and finish all the details before the rain starts in the fall.
They aren't crazy about being picked up. Here's one of the blue slate toms.

Here he is in the new coop. I think his head is so red because he was pissed. I still hadn't cleared all of the scraps out yet. I just wanted to get them moved.

Next came the only hen out of the four. She was similarly unsettled by my laying hands on her.

I managed to bring the last two up together. I would guess that they are about half as big as they will eventually get but they already seem so big to me. I'm glad that they have room to flap and run around.

You can see the gaps at the base that I still needed to fill in. I filled in dirt on the inside and added dirt on the outside to the same incline of the hill. Eventually I'd like the floor of the coop to be level but I'll have time to do that later.

Alex has decreed that there will be no more building projects for the rest of the summer. I think he's sick of me spending every weekend, all weekend up on the hill. I'm sick of it too. It will be nice to spend some time in the garden instead :)
Alex has also identified which turkey will be the first dinner. It's the one that did this to him:

We were trying to show the turkeys the roost where they can sleep off the ground. It turns out they have little velociraptor claws. Fine, they can sleep on the ground.

I had a piece of sheet metal that was the original door that came with the shed kit. I screwed that over the opening. It's ugly but will keep predators out until I can replace the door.

The chicken door looks a little twee in the context of the turkey coop.

I also hit my head on the top a couple times. It will be nice to get a taller door in here at some point.

The other things I need to finish before moving the turkeys up was to fill in all the openings that a critter could get through. There were gaps between the rafters above the top plate that I filled with 2x4s

I added hardware cloth at the base to inhibit digging.

And I filled in the gaps between the back wall and the hill.

The mesh was just held on with staples so I covered the ends with particle board to hold it down. I'll replace it later with something more durable and better looking.

My goal was to make the coop safe enough to move the turkeys up. I can paint and finish all the details before the rain starts in the fall.
They aren't crazy about being picked up. Here's one of the blue slate toms.

Here he is in the new coop. I think his head is so red because he was pissed. I still hadn't cleared all of the scraps out yet. I just wanted to get them moved.

Next came the only hen out of the four. She was similarly unsettled by my laying hands on her.

I managed to bring the last two up together. I would guess that they are about half as big as they will eventually get but they already seem so big to me. I'm glad that they have room to flap and run around.

You can see the gaps at the base that I still needed to fill in. I filled in dirt on the inside and added dirt on the outside to the same incline of the hill. Eventually I'd like the floor of the coop to be level but I'll have time to do that later.

Alex has decreed that there will be no more building projects for the rest of the summer. I think he's sick of me spending every weekend, all weekend up on the hill. I'm sick of it too. It will be nice to spend some time in the garden instead :)
Alex has also identified which turkey will be the first dinner. It's the one that did this to him:

We were trying to show the turkeys the roost where they can sleep off the ground. It turns out they have little velociraptor claws. Fine, they can sleep on the ground.
Friday, June 24, 2011
Turkey Coop, 1

I mentioned last week that the turkeys are getting too big for the chicken tractor. I planned on spending this weekend starting a new coop and run for them up on the hill. I was hoping that I could build an 8'x8' run for them this weekend and then add another 8'x8' cube later that would have a 4'x8' coop with storage on one end. I had a rough list of stuff to get at Home Depot but when I got there all of the details went mushy in my head. I was planning on footing the posts for the run and coop at 8' on center but when I looked at some of the material it came in 8' lengths, so I considered footing the posts so they were 8' apart so I wouldn't have to cut stuff like corrugated metal. But that seemed to mess up the panel sizes for the roof, and that made me wonder how I was going to attach the horizontal 2x4s to the posts, and that made me realize that I wasn't sure how long the eaves on the roof would be or even how long the joist would be. I had more questions than answers and ended up spending two hours there hashing things back and forth.
I still ended up getting a bunch of stuff that I knew I could use but decided to come back for the rest once I had made some decisions at home.
This is what I ended up getting. I doesn't look like that much but it took me 16 trips to get it up the stairs to my house. And that was the end of my day. It turns out 16 trips is about 7 more than I would prefer to make at any one time. Especially when carrying 50lb bags of cement.

I spent the rest of the afternoon lying in bed under the fan working on my drawing of the coop. I managed to make some decisions and have a better idea how to proceed.
I'm going back to my original plan with the posts 8' on center. This will give me a space approximately 8'x16' which is 4 times what the turkeys have now. These drawings show the downhill face and the side of the run. The posts will be sunk 3' in the ground leaving 7' above. You can see there is some digging involved and I've even showed the area above the coop being backfilled with gravel to help with drainage. That would require carrying bags of gravel up the hill so we'll have to see if that actually happens. Alex is conveniently relaxing on the beach in Florida this weekend so we are limited to 1 manpower on this project. (click to embiggen)

I decided that even if I only enclosed half the space for now that I would put in all the posts and top beams at once. I feel like it will be stronger if it is all tied together by two 16' 2x4s on the long ends. This will also set the dimensions so I can figure out the dimensions of the roof.

Next comes the rest of the structure. I'm breaking up each 8' span in half except for the part with the door

The coop will be on the left. Here you can see the doors into the storage section on top to hold feed and some turkey sized nest boxes on the bottom. I think the two hens will start laying before the fall so I thought I better have a place for them to feel comfortable. The bottom two feet of the run will be covered with some solid material. I had pictured corrugated metal because it is light and strong but it wouldn't be easy for me to cut, especially along the curvy end. I saw some Hardiplank cement board while I was at HD that I would like to build the coop out of. I could use the same panels ripped in half for the run walls. The back wall of the run has to serve as a little retaining wall and the Hardiplank shouldn't rot so It could be a good choice, it also endes up being cheaper and is easy to cut on the table saw. It's really heavy though and I already have lots of heavy stuff to drag up the hill.

The top of the run will be 2"x4" welded mesh. This is a lot bigger than the 1/2" hardware cloth that I prefer but there should be enough space that the turkeys won't be within reach of varmint paws. Hopefully the two foot run wall will also provide enough protection.

And the roof. It would be easier to do an angled flat roof but the peaked roof looks so much cuter. I can get the roofing material in 12' lengths and cut it in half to give me some nice long eaves. It might be overkill but it will provide that much more protection from the sun and rain. And it's cute :)

This looks like a month's worth of weekends to get done, but maybe I can get the right hand side done sooner. That will still give the turkeys twice as much space as they have now.
Sunday, June 19, 2011
Turkeys
I'm still fascinated with turkey's. I'm only going to inflict about 10% of the photos I've taken on you. Remember when they were too small to even get in the door? Now they're almost too big to get in.

The also like to flap their wings as soon as I let them out. I have to admit that I thought I would have a little more time before they got too big for the the tractor. I was going to spend the weekend working on a new coop for them but then I was felled with an eye infection. Looks like they're going to have to spend an extra week jammed cheek by gobbler in the little coop.

I think I ended up with two toms and two hens. Did I say that already? This guys is getting a nice nubbly head.

The Royal Palms are starting to get their black markings.

I even heard one gobble today, instead of the peeps they've been making up to now.


The also like to flap their wings as soon as I let them out. I have to admit that I thought I would have a little more time before they got too big for the the tractor. I was going to spend the weekend working on a new coop for them but then I was felled with an eye infection. Looks like they're going to have to spend an extra week jammed cheek by gobbler in the little coop.

I think I ended up with two toms and two hens. Did I say that already? This guys is getting a nice nubbly head.

The Royal Palms are starting to get their black markings.

I even heard one gobble today, instead of the peeps they've been making up to now.

Subscribe to:
Posts (Atom)