Friday, January 14, 2011

Potato Towers/Chicken Spa

Despite what it looks like, this isn't a pile of dead chickens.


Chickens love to take dustbaths and they love to do it communally. Out of the whole dusty yard they choose to do it in the tires I use for growing potatoes. The idea is that you start with one tire and as the plant grows you stack another tire on top and fill it with dirt. This encourages the plant to grow a longer stem or something and produce more potatoes. I've put off planting the seed potatoes because the chickens have been spending so much time in their little tire spa.


I figure that since they all like to bathe together, roman style, they can make do with one tire.

I've had a plate of sprouted potatoes sitting on the dining room table for weeks now so I threw them into the two back tires.


Then I filled them up to the rim with dirt and compost and stacked the next tire one top.


I think this will keep the chickens out.


This I'm not so sure, but I didn't have anymore hardware cloth, so the tomato cage will have to do.


They seem happy with the arrangement:

Vegetabable Bed 1

So I cleared out the last of the Summer vegetable bed. All that was left was a scraggly tomato that was late to ripen and an unexpected bonus.


a giant mushroom.


It looked a little like a portobello but I was scared to eat it.


It would have made a pretty decent meal

Vegetable Bed 2

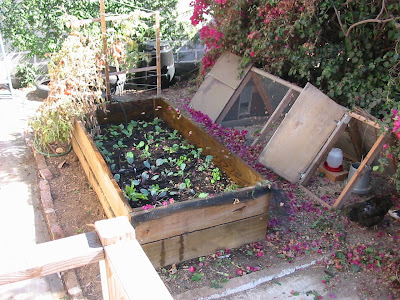
After getting rid of all the giant fungus I was ready to put in the winter bed. As usual I was running late and chose to put in started plants rather than growing from seeds. One day I'll get my act together and plan all of this better.

I put in some cabbage, lettuce, broccoli, brussel sprouts, and chard. They always look so small when they go in.

This shot was taken about mid morning and already the bed was in shade. In the winter the sun is so low in the sky that it gets blocked by this beast:

The bougainvillea is pretty but it's so aggressive and thorny. It also has aspirations to take over the whole yard. I haven't cut it all the way back yet because it offers nice screening from my next door neighbor, but it needs a lot more maintenance before I feel like I'm the boss of it and not the other way around.

I decided that now was as good a time as any to try to tame it. I feel like I cut a bunch off but there is still a long way to go.


Before:


After:

I feel like there's almost no difference. I think I need a taller ladder.

By the time I was done the bed was completely in shade. I'm hoping my trimming will give it a couple more hours of sunlight a day.


I managed to get it all in the green bin. Normally I would try to chop it up and compost it but it's just too thorny and woody and I wanted to be rid of it. I'll let the city run it through one of their big shredders.

Good riddance.

Vegetable Bed 3

The Winter bed has filled in nicely and is being admired by this pullet. There is bird netting that goes flat across the sides to keep her kind out but now that the plants are bigger the pullet can reach through and nip off the new growth that is pushing against the net.

That doesn't bother me that much but sometimes she jumps on the net like a trampoline and breaks the stems of the lettuce.

It also seems like it's time to make more room. The broccoli is pushing for more space and the butter lettuce is bolting right through the net.


Here you can see the garlic where the chickens have taken a little off the top.


I decided to expand the netted area with pvc tubing.


I used 1" diameter tubes as sleeves and attached them to the sides of the bed.


The rails are made from two 5' pieces of 1/2" joined by a corner piece.


They slide into the sleeves easily but the tension keeps them tight and upright. I was impressed with how rigid they were.


I wasn't expecting it to looks so much like a covered wagon. I kinda love it.


I had more netting that was thrown over the top and secure with screws at the bottom.


Hopefully everything has enough room for a while.

Saturday, January 8, 2011

Steps

I finally started cutting some steps into the hill. During the dry season it's pretty easy to hike up the hill but once it gets wet the mud gets really slippery and it's kind of like a treacherous game of chutes and ladders, but with all chutes.

At the suggestion of a friend I used 4x6s with rebar pounded through them into the ground. I still have grand visions of rickety wood staircases winding up the hill like the Mine Ride at Cedar Point, but that would take me forever and I wanted something that would be up quickly. As usual I thought I could get it done in about a 1/3 of the time it actually took.

I was lulled by the first few steps that I put in. It seemed like it was taking me about a half hour a step and the janky calculations I did led me to believe that I would need about 16 steps. That sounded like a weekend's worth of easy work.


I ran into trouble as I moved up the hill. I thought I had figured out what the slope of the steps needed to be but the tread of my first few steps was apparently too long. The steps were at a shallower slope than the hill so I was digging further and further into the hill with each step. And moving a lot of earth to do it. I decided to make the treads gradually shorter so the steps would be more in line with the level of the hill. I still had to do a lot of digging though as you can see from the dirt piled up on each side of the stair way.


My next challenge was this:

A giant piece of sandstone right where my next step was supposed to go. I tried to sledge hammer it out but it just broke off little chips and it was tiring me out. That big hammer is heavy. Luckily I found this beaut in the crawl space under my house:

The rusty pick was totally in keeping with my visions of the Mine Ride, and it dig a great job of breaking up the rock.


I was feeling pretty awesome about my accomplishments up to this point until I uncovered this:

That's the concrete foundation to an old rotted out fence post, and my new friend the pick was totally useless against it. The only thing I could do was bash it with the sledge hammer until it cracked into small enough pieces that I could pry them out.

Inside the concrete where the post would have been I found this old Pepsi bottle. I can't remember the last time I saw Pepsi in a bottle and the logo looked pretty old. I managed to not smash it so maybe I'll keep it for something. Maybe it can be a twee little retro bud vase for all the flowers people give me. :)


Maybe I should have called it quits for the day after that one. My 1/2 hour per step average was totally shot and I was hot, tired and aggravated. I pressed on and almost instantly regretted it. As I was pounding the rebar into the next step I made a bad blow with the hammer and bent the post. There was more sand stone under the step that I was trying to drive the post into. It took a lot of force and obviously better aim than I could muster so late in the day. I belatedly decided to take the rest of the day off.

It ended up taking 20 steps and two weekends to get the thing done. Part of the second weekend was spent redoing the last few steps that were all crooked and ugly from me being too tired to care at the time.

It's been a couple of months since then and the hill is doing it's best to reclaim the stairs. Between the oxalis and grass shooting up after the rains and the gophers sending torrents of loose dirt out of their burrows you almost can't see the stairs anymore.


I went back in and dug out some of the gopher land slides but the stairs still look like they've been there a long time already.


The good news is that they work. Even when it rains I can get up this part of the hill without worrying about sliding back down. Now I only have two more sections of hill to cover and I'll be able to get from my house to the chicken coop like a person instead of a goat.

And More Steps

Since I made so much progress with the last step project I thought I would finally build some steps up to the door of the chicken coop. For the last two years I've been high stepping it over the door jam but my old bones are starting to complain.

I used a Home Depot gift card I got (thanks Jason) and got a redwood 4x4 and some block footings and scavenged the rest of the wood from scraps I had lying around the house.

I did all of my calculations and cuts down at the house and then carried it all up the hill. It all went together pretty well and I only had to disassemble one part and put it back together. Not bad.

I can't decide if they look scarier from this angle

or from this angle:

My scraps ran out before I had the whole deck covered. The building inspector wouldn't like it but it works. It will probably take me a couple more years to fill in the gaps. : /


Rather than the "death walk" I like to call the new addition the "observation deck." I was jealous of the chickens view before but now with a 2 1/2 foot boost the view is even better, even framed by the sopote tree heavy with fruit.

Lucky chickens

Now that I've been using theme for a few weeks I think I might have made them too high. I have to bend over to get through the door. I think I preferred the high stepping.

Predator Protection

My first priority when it comes to the chickens is predator protection. Although there are a lot of other things you need to consider to keep chickens happy and healthy, nothing can destroy a flock faster than an animal getting into the coop and killing them.

When I built my coop I was paranoid about coyotes and racoons so I tried to make the coop as impregnable as possible. I used 1/4" hardware cloth on the run and door and even buried it under the ground around the perimeter to keep varmints from digging their way in. So far it has worked and nothing has gotten in.

What I didn't plan for was the chickens literally undermining my efforts. All of their scratching in the run has moved enough dirt that there was a visible hole leading to the outside. It was still covered with hardware cloth and I piled some plywood over it but it wouldn't take much for an enterprising racoon to discover it and find it's way in.

Here you can see the section that the chickens had excavated. The whole area under the hardware cloth was an open cavity.


I used pieces of sandstone and concrete that I had dug up while building the lower stairs to fill in the gap.


I also used some of the excess dirt from the stairs to pack it all in tightly.


Here's the view from the inside. I'm hoping that the big pieces of stone will keep the chickens from digging their way out again.


Then I covered the whole business with more dirt. Supposedly most animals will try to dig right up at the edge where the plywood is and will be stymied by the wire mesh under the dirt. So far so good.